
ADVERTISEMENT
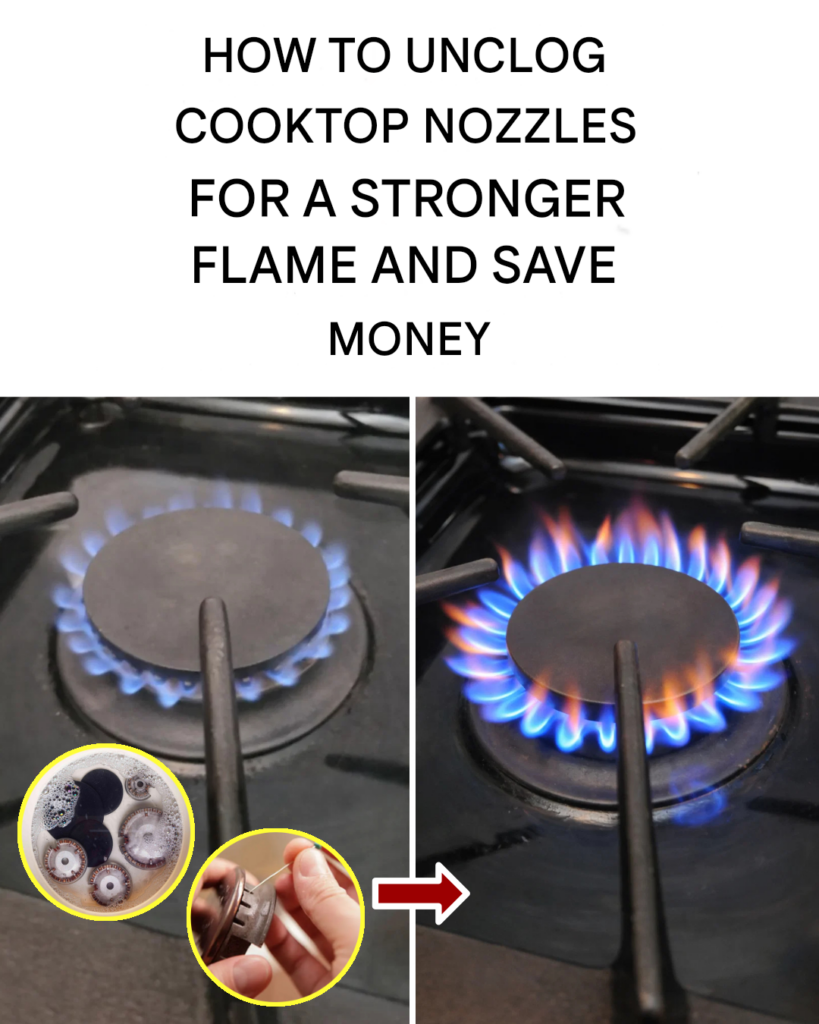
A gas burner that lights slowly, produces an uneven flame, or stays weak may simply have food residue blocking its small burner ports.
However, it is important to identify the correct part before cleaning. The small holes around the removable burner head are not the same as the gas orifice beneath it. Cleaning the ports may be a reasonable maintenance task, but inserting wire into the actual gas nozzle can damage or enlarge it and affect how the appliance burns fuel.
Always check your stove’s owner’s manual before removing or cleaning burner parts.
ADVERTISEMENT
Stop If You Smell Gas
Do not attempt to clean or test the stove if you smell gas or hear a possible leak.
Leave the home immediately and contact your gas utility or emergency services from outside. Do not turn lights, appliances, or other electrical devices on or off before leaving.
Cleaning is appropriate only when there is no gas odor and the problem appears limited to removable burner parts.
What You Will Need
Depending on the manufacturer’s instructions, you may need:
- Warm water
- Mild dish soap
- A soft cloth
- A nonabrasive plastic pad
- A soft toothbrush
- A straight pin, sewing needle, or twist tie if approved by the manual
- A clean towel
Do not use electrical tape, thick wire, a drill bit, or any object wider than the original burner opening.
Step 1: Turn Everything Off
Make sure every burner control is in the OFF position.
Wait until the cooktop, grates, caps, and burner heads are completely cool.
Some manufacturers may also recommend disconnecting electrical power or shutting off the gas supply before service. Follow the instructions for your exact model.
Do not pull the stove away from the wall or disturb the gas connection.
Step 2: Remove the Burner Parts
Lift off the grate, burner cap, and removable burner head.
Note where each piece belongs because burner caps and heads are not always interchangeable.
Take a quick photo before removing them if you are unsure about their position.
Do not force a part that does not lift off easily. Some burner bases are fixed to the cooktop and should not be removed by the user.
Step 3: Wash the Cap and Burner Head
Clean removable caps and heads in warm, soapy water.
Use a soft toothbrush or nonabrasive plastic pad to loosen grease and dried food. Avoid metal brushes, harsh abrasives, bleach, and oven cleaner unless the appliance manual specifically permits them.
Rinse the parts thoroughly.
The burner components must be completely dry before reassembly. Moisture trapped inside the ports can cause clicking, delayed ignition, or an uneven flame.
Step 4: Clear the Burner Ports
Inspect the small holes around the burner head.
If your owner’s manual allows it, gently pass a straight pin, fine needle, or twist tie through a clogged port. Move it carefully without applying sideways pressure.
Do not:
- Enlarge the opening
- Distort the metal
- Use a thick piece of wire
- Break a wooden toothpick inside the hole
- Push debris deeper into the burner
- Scrape the port aggressively
The goal is only to remove loose material while preserving the original size and shape of the opening.
Do Not Poke the Gas Orifice
Under the removable burner head, you may see a small brass gas orifice or gas tube opening.
Do not insert a pin, wire, needle, or cleaning tool into this part unless the appliance manufacturer specifically instructs you to do so.
An enlarged or damaged orifice can release the wrong amount of gas and produce an unsafe flame.
Wipe the surrounding area gently with a damp cloth, taking care not to let water or cleaner enter the gas opening.
See more on the next page to continue reading →
ADVERTISEMENT